Use the Clear Touch Interactive Panel as a Secondary Monitor in Extend Mode
Using your Clear Touch Interactive Panel as a Secondary Monitor in Extend Mode
***For the best experience, we recommend mirroring or duplicating your display***
With Windows 10, Microsoft has given users the option of running multiple displays in either Mirrored (duplicated) or Extended mode. Setting your displays to run mirrored mode will make your Clear Touch Interactive panel display the same image as the other monitor(s) connected to your Windows 10 PC. This is typically the recommended method of setting up your Clear Touch display in conjunction with your other monitors, as it is the easiest to configure and manage.
Extended Mode will cause each of your monitors to function independently, greatly expanding the amount of screen real estate for the user. The biggest drawback at the moment is that Windows only allows you to interact with a single display at a time. For example, you will not be able to use the touch functionality of the Clear Touch while also using your mouse to interact with your computer's main monitor. However, it does give you the advantage of being able to have separate windows or applications open on your Clear Touch and desktop or laptop monitor(s).
To set up your Clear Touch display in Extended mode, first right click (or long press) your desktop and select Display Settings from the dropdown menu, and change the setting underneath Multiple Displays to Extend these displays. You'll then need to select which display you want to be the main display by selecting the display number at the top of the menu (marked 1, 2, or 3) and then checking the box next to Make this my main display (please see image below). Your main display is the one that will have your desktop shortcut icons, and most programs will open by default on the main display.
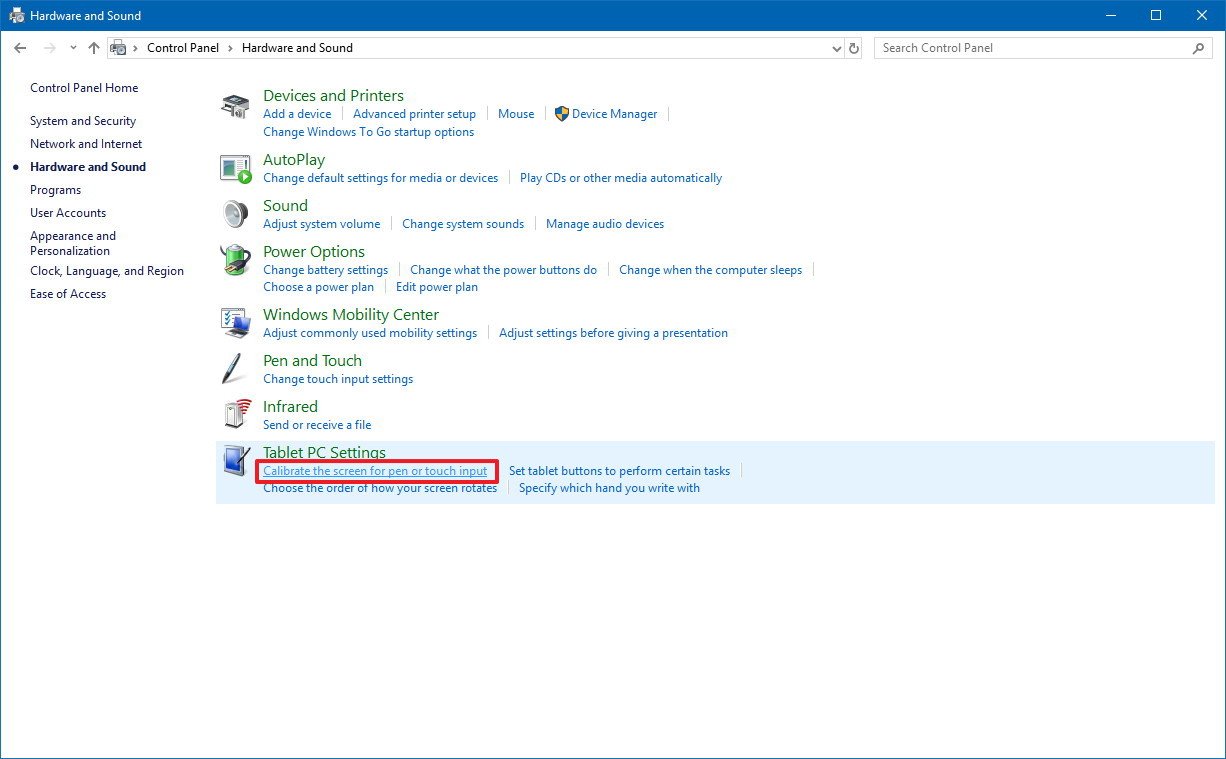
Next, we'll need to calibrate the touch settings so that Windows 10 understands which of your displays is a touch screen. Please follow the steps below:
- Search for and open the Control Panel
- Click on Hardware and Sound
- Under "Tablet PC Settings", click Calibrate the screen for pen or touch input

- Under "Configure", click Setup

- Touch the touch screen that Windows prompts you to with the large gray prompt, or press Enter if it is not a touch screen. The box will cycle through each of your displays, so be sure to follow the touch prompts when they appear on your Clear Touch display or any other touch-capable monitor you have.

The Setup tool will close automatically after it has gone through each of your displays. Check the touch functionality afterwards to ensure that Windows is registering the touch inputs on the correct display, and run the Setup again if you encounter any issues. From here on out, you'll be able to use your Clear Touch display running in Extended Mode. Please note that this process can also be used for connecting multiple Clear Touch displays to a single Windows 10 machine.
Related Articles
How to Calibrate Touch on Internal PC Module (Windows 10)
How to Calibrate Touch on your Clear Touch Internal PC Module (Windows 10) 1. Go to the white Search Bar in the lower left corner of your Desktop. Click it and type "Control Panel." When Control Panel pops up in the right menu, click it. 2. When the ...Installing Windows 11 on a Clear Touch Interactive PC Module
Clear Touch Interactive offers a range of Integrated PC Modules that can either be purchased pre-loaded with Windows 10 Pro or without an operating system. If you or your organization chooses to purchase your PC Module without an OS, you will need ...Installing Windows 10 on a Clear Touch Interactive PC Module
Clear Touch Interactive offers a range of Integrated PC Modules that can either be purchased pre-loaded with Windows 10 Pro or without an operating system. If you or your organization chooses to purchase your PC Module without an OS, you will need to ...How to Enable Advanced Code Mode in Collage
*Note: With the update to Collage v5, Advanced Code Mode is the default mode for all connections. Please see the Collage v5 White Paper for more information. If you are experiencing issues connecting your external device to a Clear Touch panel using ...Fix for Clear Touch Interactive PC Module Shutting Down Using Streaming Services.
The following fix will apply to panels of the following series: 6000U, 6000K, 6000K+, 8086MAX, 7000X, and 7000XE. If you have experienced your Clear Touch Interactive PC module shutting down and/or going to a black screen and displaying "No Signal" ...